The Google Custom Search Engine (CSE) is a server side program written in C++ for web developers to improve their individual search results. It comes in few different flavors as advanced as Google Enterprise Search servers to Google-hosted search pages. I will go into the deep end with Google Custom Search for personal websites, a free service provided by Google Inc (THANK YOU Google).
Advantage of CSE
Unlike a general Google Search or website specific Google Search (search site:http://sanuja.com/), CSE allows great deal of control over the behaviors of your site search. The themes, refining filters, AdSense and results page layouts are few examples of customization options. You do not have to use all them, but you can improve the user experience of your visitors utilizing these tools.
Yes it is a free service as long as you allow Google Ads in results pages. I do not have any problem with this and I think it is a good deal for me too. Why do you ask? Because if you have an AdSense account, you can use that for the must have ads. This way if someone clicks on an ad, it will also go to your AdSense revenue. To me this is a win-win situation. If you do not want them to insert ads, Google Inc offer several different packages. They are based on the volume of search requests. Once you signup for an CSE account, you will be able to choose one under the “Business” section. NGOs and registered Educational institutions such as University of Calgary, could apply for an ad-free account without any addition cost. Contact Google Inc for more details.
This will also reduce the load on your servers specially during peak search periods. For some users CSE will speed up the search results because it is run on a Google server independent of their web server.
Some claim, which I am not sure about, that the CSE quarries will increase the page ranking of your web pages in Google index. However, I can not seems to find any official information on their website.
Creating a Search Engine
Google Inc constantly updating their user interface (UI) on all of their products and services. The Google CSE administration section has been changed several times now that if you “Google search” information about it, you will see slight variations in instructions. As of 31-May-2013, the following steps would work for sure. Also keep in mind, they have switched from using PHP functions and iframes to JavaScript codes. This is better for most developers working with CMS programs.
Signup for a Google CSE Account or use your existing Google Account (Gmail, Drive, etc) at here
Create a Search Engine using admin options using New search engine. After creation verify your website ownership (if you haven’t done that in the past for other Google services such as AdSense). These are very easy to do, so I am not going to explain in depth.
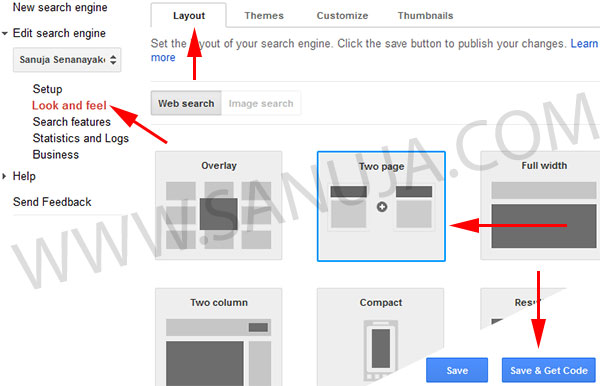
Click on the newly created CSE and go to Setup. There you will see a lot of option, which also may appear in other areas such as in the Look and feel section. Again, I am not going to touch this today. The only thing we will change right now is the layout under Look and feel.Layout tab in Look and feel section. Because most website owners wants to have a search form separated from the results page (almost all default CMS search engines), choose Two page layout and click Save and Get Code.
Notice
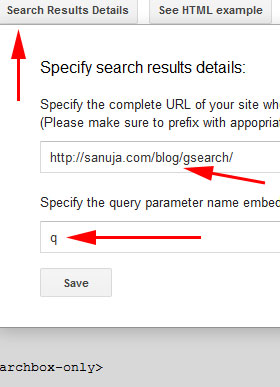
There are several options on how the results are shown. The two page option allows you to specify the results target URL under Search Results Details. Please note the results URL must match exactly what you have on your site. If your site has HTTPS, the results URL must have HTTPS instead of HTTP. How your web server handle the trailing slashes also have an impact on results load time.
Before you copy the code, click on Search Results Details button. It will show you an option for your results URL and an option for query parameter. Search Results Details drop down window. Enter the intended search results page location (second red arrow) and change the query parameter to whatever you like. I recommend keeping the query parameter in its default state, q, because most CMS programs use s and other letters for their default built in site search. I found if this parameter is exactly the same as the built in one, it could potentially create a code conflict. But you can use anything you like from one character to several. Examples of custom parameters I came across on well reputed sites, cx, ser, search, s, etc.
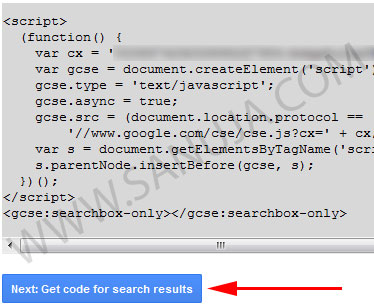
After you set up everything by following the steps above, you are ready to copy the code! Make sure you copy and paste both the search form and the search results code.Get the codes. We will make a one simple modification to the results code later…
Copy and paste the search form at whatever the location you like and the results code in the same per-defined location.
Search form on steroids
If you want to use all the Google default settings on a simple HTML/PHP site, then you are done. But where’s the fun in that? There are few things you can do with a custom written search form. But you have to be careful on certain tags and attributes. You must have the name is set to the per-defined query parameter. I choose to go with the Google default, q. I will walk you through several different scenarios of integration.
Integrating CSE to HTML/PHP site
The following code will create a simple HTML form.
But this will not send the results to your custom results page we created. In order to do that, replace the http://google.com/cse with YOUR_URL. On this site it would be /blog/gsearch/(from now on I will be using this URL in my examples) or I could also use https://sanuja.com/blog/gsearch/.
Custom form background image
The copy/paste code Google provide for your CSE has a background image, . But in our custom search form, have the text “Site Search (type+Enter)”. If you prefer the original Google CSE look and feel, we can add that using the the same code Google uses. The only change I would make is to load the background image from your own server as opposed to loading directly from Google. This will reduce the load time of your pages with the CSE form.
First we will extract bits of code from Google provided search box and then we will add that to our custom HTML form. Copied the following from the official Google CSE Blog.
The part we are interested in is style="width: 100%; padding: 0px; border: none; margin: 0px; height: auto; outline: none; background-image: url(https://www.google.com/cse/intl/en/images/google_custom_search_watermark.gif); background-color: rgb(255, 255, 255); background-position: 0% 50%; background-repeat: no-repeat no-repeat;" You can add this exact background image code within your input tag. If you took my advice and decided to load the image from your own server, change the background-image: url(YOUR_IMAGE_URL) to the appropriate URL.
Integrating CSE to WordPress
Let’s say you want to replace the default search in your CMS with the Google CSE. You can do this by editing the file or the code that contains the default search form. In WordPress it is searchform.php and in Drupal it is search-theme-form.tpl.php.
For the WordPress(WP) and Drupal(DP) examples, I am going to strip the search form as much as possible and add items from the barebone code. The following codes are separated with comments in between them. It is very self explanatory; the first one is the most barebone (must have values) and new tags, values and attributes get added as you go down the code.
Few new items autocomplete="on" is one of many Google CSE input tag attributes. “Google it” for more information on it. The placeholder="Site Search (type+Enter)" is a HTML/5 input tag attribute for displaying a message to the user within the search box (kind of like the background image). The x-webkit-speech or x-webkit-speech="x-webkit-speech" is an odd code. It is only utilized by webkit browsers and most specifically Google Chrome. It is speak to text framework. The nice thing about it, when it is not supported by the browser, it will simply disappear.
You can replace the default code in searchform.php with one of the three codes above in WP. DO NOT save all three sets; it may result in a PHP error. I recommend using a Child Theme with the searchform.php to implement this change to the theme file.
I prefer the second or the third one. On this site we have a combination of the second and the third one. The problem with the forth code set with full blown version is that it may mess up your theme. It will add two extra lines; one on top with “Search” and one on the bottom with the button, “submit”. However, if your search box is in a sidebar area or placed in a location with lots of room, this last option can be the best one for you. It is all coming down to the styling of the website.
Integrating CSE to Drupal
Now I have already introduced all the nuts and bolts of Google CSE, we can jump into custom Drupal module creation. According to the guidelines for Drupal modules, which is like WP plugins, you should create the following files;
– CHOOSEN_NAME.info
– CHOOSEN_NAME.module
– CHOOSEN_NAME.js
The only major difference between DP and WP implementation is that in Drupal, even the integrated search itself is actually a “module block”. Therefore, you can simply create a module and install it. All the instructions for this is already well written here. If you have any specific questions, feel free to contact me.
I use cookies to optimize site functionality and improve your experience. By continuing to use this site, you accept the use of cookies stated under Privacy Policy and Terms of Use. Read MoreACCEPT
Cookies
Privacy Overview
This website uses cookies to improve your experience while you navigate through the website. Out of these cookies, the cookies that are categorized as necessary are stored on your browser as they are essential for the working of basic functionalities of the website. We also use third-party cookies that help us analyze and understand how you use this website. These cookies will be stored in your browser only with your consent. You also have the option to opt-out of these cookies. But opting out of some of these cookies may have an effect on your browsing experience.
Necessary cookies are absolutely essential for the website to function properly. This category only includes cookies that ensures basic functionalities and security features of the website. These cookies do not store any personal information.


2 thoughts on “Integrating Google Custom Search”
Comments are closed.