The max_input_vars limitation error is a very common issue that most WordPress web developers and website owners may encounter at some point in their career. Few days ago, my website also experienced the same problem. The solution is very simple; increase the value assigned to max_input_vars in the PHP configuration file on the web server. However, depending on server setup, you may have to do few more things to get this problem fixed.
Warning!
Editing php.ini may result in complete failure of the php module and it may put your website out of service. If you are hesitant about something, hire a professional. I take no responsibility for any issues arise out of the following instructions.
Problem
The max_input_vars typically impacts the behavior of your WordPress (WP) menus. Regardless of the location and positioning of your menus on the front end, if you have a menu or several menus, every single item in every menu is counted towards the max_input_vars limit (directive). For example, if a website has a top main menu and a bottom footer menu with 10 items in each, the total maximum input variables or max_input_vars count is 20 (or sometimes even more, but I am not going into depth on how you could have more than 20 variable counts with just 20 items).
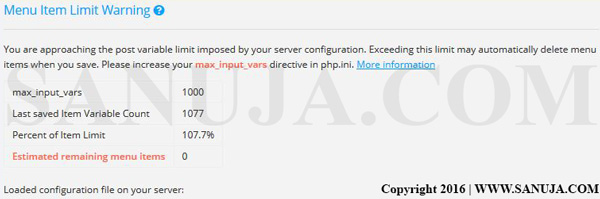
The error message is usually displayed within under Menus settings in the WordPress administration area (image above). The exact error massage may vary from server to server or depending on the plugins and other add-ons within your WP install. The above message for example reads “You are approaching the post variable limit imposed by your server configuration. Exceeding this limit may automatically delete menu items when you save. Please increase your max_input_vars directive in php.ini.” As such this problem may lead to inexplicable disappearance of menu items from your website.
Solution
First you need to know how your PHP is configured. To check the PHP configuration;
1. Create a blank PHP file within your web folder (www folder). You can name it as anything (eg. phpinfo.php or test.php).
2. Add the following PHP code to the new file you just created and save.
<?php
// Show all information of the PHP configuration
phpinfo();
?>
3. Open a web browser and access the .php file you just created. The URL is youerwebsite.com/location/file.php (basically direct http request for the new file).
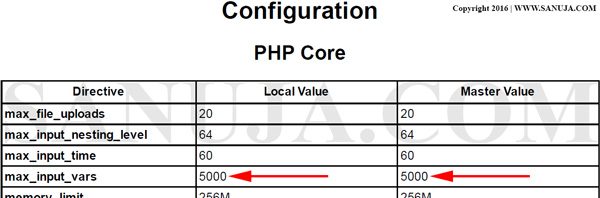
You should have all the information about you PHP configuration. Look for max_input_vars local and master values. Now you know what your PHP configuration is, you can take the next step. If you already have a high value for the directive, skip to “If the Solution Does Not Work” section of this article.

The first line of attack is the php.ini configuration file in your PHP root install. If you are running your own servers, then find the php.ini within the PHP install folder. If you are renting a server from a hosting company, please follow their instructions on how to edit php.ini.
Sometimes web hosting companies do not have the php.ini installed by default in your root. In that case, you should create a php.ini file within the root of your server. Then edit or add the line, “max_input_vars = xxxx”, where xxxx is the variable limit or directive.
If you are not allowed to add php.ini file or you cannot use that method to override default PHP server configuration, you may do so using .htaccess file. Simply add the following code to the somewhere in the .htaccess.
php_value max_input_vars 1000
Typically, you should have max_input_vars around 3000 range for any WP large scale website. But these solutions may not resolve your problem.
If the Solution Does Not Work
If the editing of the php.ini default or root did not resolve your problem, which is most likely the case, then you have to change the max_input_vars within the WP administration folder. Here is how you do that;
1. Access your www web folder within your server using either FTP or web based file managers such as cPanel.
2. Open wp-admin folder within your WordPress install.
3. Create a file inside wp-admin folder with the file name, php.ini.
4. On the very top, add, max_input_vars = xxxx.
5. Save the file and exit.
Refresh or log back into your WP area where the error message showed up. It should be resolved now. It is important to understand that the root php.ini sets the limitation to the entire web folder of your server. If your root folder is set to a lower limit than the wp-admin, then it would most likely not going to work. Make sure your root php.ini is set at a higher value than the value in the wp-admin folder.
Enjoy and happy computing.