In Structural Geology, the orientations of geological features are extremely important. Field Geologists record strike and dip of structural features. These data later can be used for analysis and interpretation. The right hand rule is an arbitrary standardization used by some Geologists. It is not a universal rule; hence the term “right hand rule” is a misnomer.
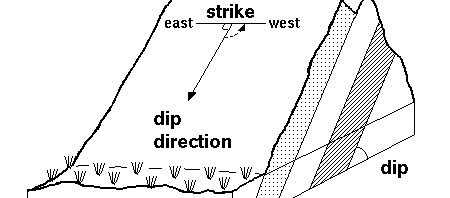
According to the Right Hand Rule (RHR), the strike direction depends on the dip. Based on the dip direction, one can obtain the direction of the strike. The data is recorded on field books in two different ways. One is using a line drawn according the angle of the strike. Another is to use the convention Strike/Dip, where Strike is represented by three numbers, while dip is represented by two (SSS/DD). On a map or a cross section, dip is usually indicated by a short line perpendicular to the strike in the direction. The strike is drawn with respect to North or azimuthal angle φ.
Important
It is important that the dip is taken in the direction of maximum slope angle. Once you obtained the general direction of the strike and dip using the right hand rule, you should always measure the maximum dip angle, prior to obtaining the strike.
To obtained precise measurements, you must find an exposed outcrop. Large boulders in the field may appear as outcrop, but their strikes and dips are nonsensical. Furthermore, you should also take into account the wreathing, tectonic events and other natural phenomena.
Working on outcrops (in the field)
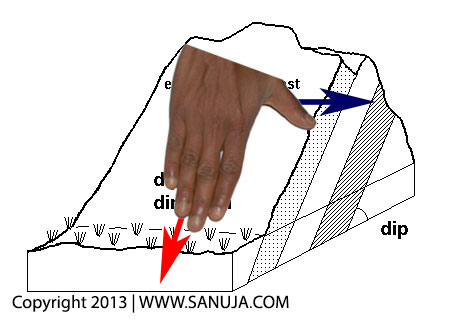
Two methods are widely used. The right hand rule using right arm and the right hand rule using the right hand itself. Both accomplish the same task, but using the arm is best suitable for large scale features on an outcrop.
Using the right hand:
- 1. Place your right hand on the surface (if the feature you are interested in is visible).
2. Rotate your hand so that the four fingers points down towards the dip direction.
3. Finally, extend your thumb on the same plane. The direction which your thumb is pointing to is the direction of the strike.
Using the right arm:
This technique can be used on large scale features to obtain the general direction of the strike and dip. However, when taking precise measurements, you may still use the right hand itself.
- 1. Stand on the side or on top of the dipping surface
2. Turn until your right hand side of the body is in the direction of the dipping plane.
3. Adjust your position until your shoulders are perpendicular to the feature. Now you are facing in the strike direction while your right arm is in the dip direction.
Working with maps
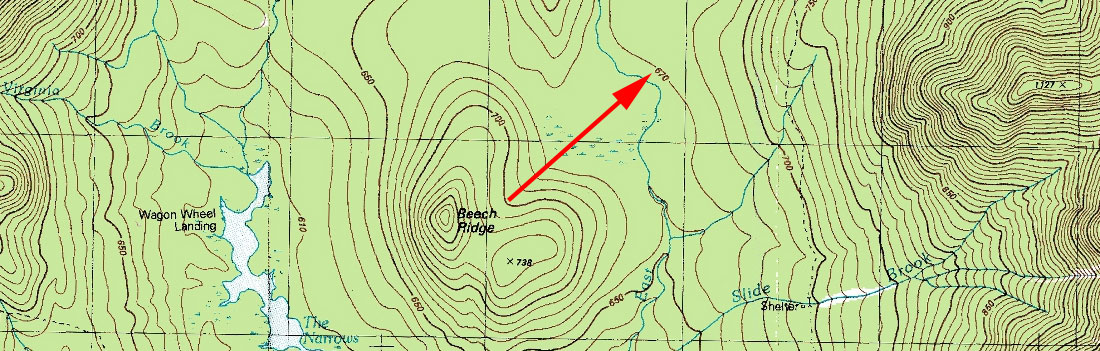
If the geological map only has contour lines, but no strike and dip information are given:
- 1. The dip direction follows from higher contour interval to lower contour interval.
2. Place your right hand on the map and rotate your hand until your four fingers are pointing towards the lower contour values.
3. Finally, extend your thumb. Your thumb is pointing towards the strike direction.
4. Place a navigational protector and measure the angle from the North towards the direction of the strike.
5. The dip can be calculated using the contour interval and the lateral distance between them. This is explained in detailed in How to Read a Geologic Map.
If the geological map contains structural features with strikes and dips, the strike lines should be drawn with the correct azimuthal angle, then:
- 1. Place your right hand with your four fingers pointing in the direction of the dip mark (tick line perpendicular to strike).
2. Extend your thumb and the thumb is now pointing towards the strike direction.
3. Place your navigational protractor with the North of the protractor pointing to the North direction of the map.
4. Measure the angle between the North direction and the strike direction. It is important that the direction which strike angle is measured depends on the direction of the dip. Refer to the diagram below for further.
Future of RHR
These are general rules I used when taking measurements of outcrops. You may use other methods; right hand or right arm. In order to get accurate measurements, some companies use surveying computers and GPS systems to collect field data. However, it seems for now these automated systems cannot surpass the ability of a skilled Geologist. Other than location corrections via GPS, I do not know any computerized system that is capable of measuring true strike and dip in the field.
While the 3D thinking is very important to a Geologist, if you are having trouble in understanding the space, it can always be improved through practice. In fact, some psychologists have created games and such to improve this type of skill. I even have talked to few Professors and Teachers Assistances (“TAs”) and some of them have trouble in special orientation. Just because you found it to be hard the first time, don’t just give up on it.