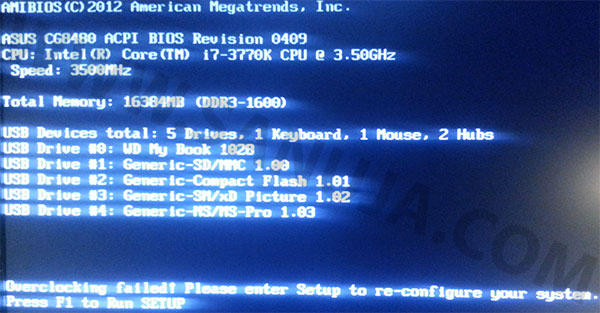
This is a well documented boot failure issue on most Asus, MSI and few other motherboards. When the issue arise, the message, “Overclocking Failed! Please enter setup to re-configure your system.” will be displayed on start up before the system goes into boot sequence. So, how can you fix this?
What causes the problem?
The K-type processors from Intel can be safely overclocked. The manufacture Asus has several built-in functions on their motherboard that takes advantage of this Intel K-type processors. The motherboards use the BIOS for hardware initialization. It can also be used for adjusting frequency and speed of processor(s) and RAM. The modern motherboards typically has the newer evolution of BIOS called UEFI that comes with better user interface and capabilities (some UEFI may still be using text based interface but with enhanced capabilities). If you have not manually overclocked the RAM or the processor before this error was displayed, then it is most likely caused by memory frequency issue.
The Intel CPU and the memory frequency is often changed during an overclocking process. It also may change during a boot-up or shutdown process. When either boot-up or shutdown processes does not go to completion due to power failure or other issues, then it may result in the frequency for CPU/RAM stuck in a higher than normal value.
YouTube Tutorial
I also have crated a YouTube tutorial and you can watch it there if you prefer a video over this article.
Fix it by setting BIOS/UEFI parameters to default
Following solution is demonstrated using an Asus motherboard with the latest UEFI firmware. However, this same principles can be applied to all modern motherboards. The location of certain menu items may be different depending on the manufacture and the firmware version.,
As instructed on the error screen, go to your BIOS/UEFI setup (F2 or DEL at the start-up). The first option is obvious; press F5 (or find other means) to set all parameters in BIOS to Default. Now reboot and if that fails, then try the following.
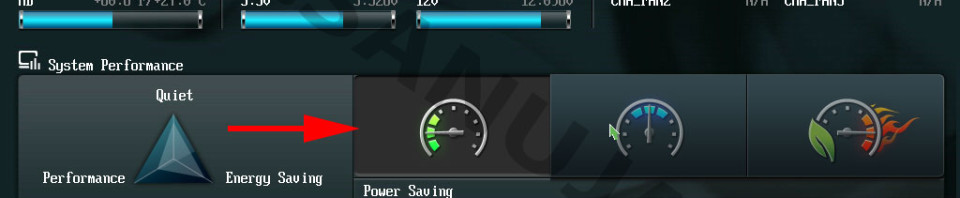
1) Change the profile under “System Performance” to “Power Saving” profile.

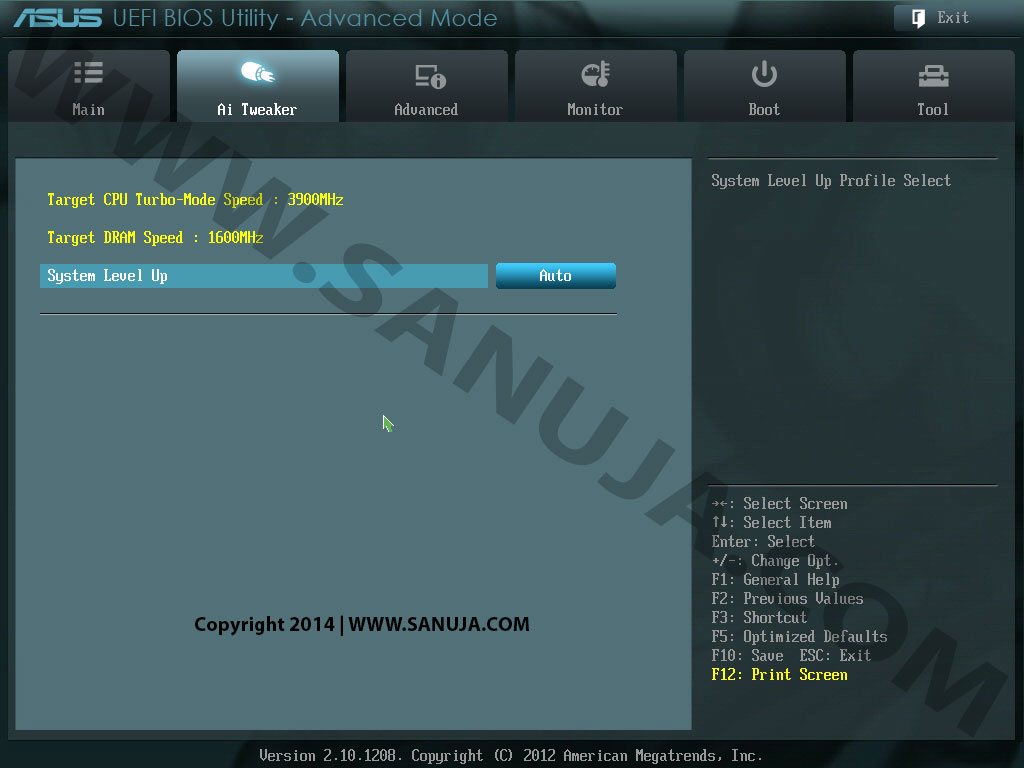
2) Go to “Advanced Mode” (select or F7-check above image) then select “Ai Tweaker” tab from the top.
3) Change the system Level Up to “Auto”. Note: if “Auto” does not fix your problem, change the setting to the lowest level.
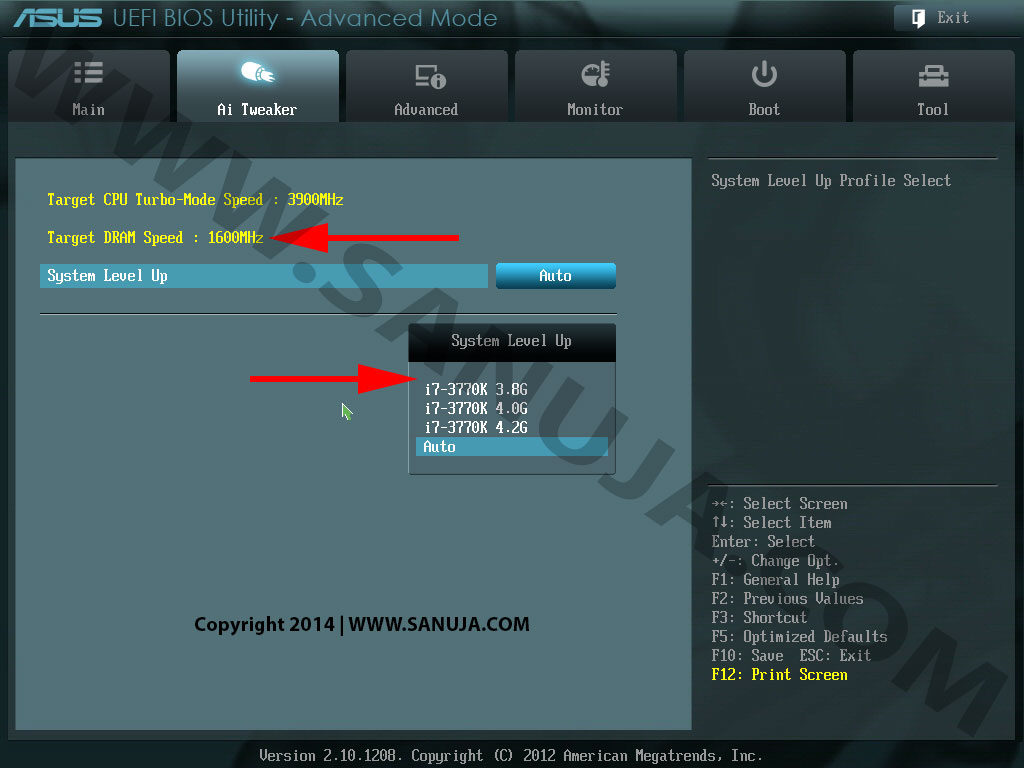
4) The Target DRAM Speed should read around 1600MHz (or lowest RAM speed possible).
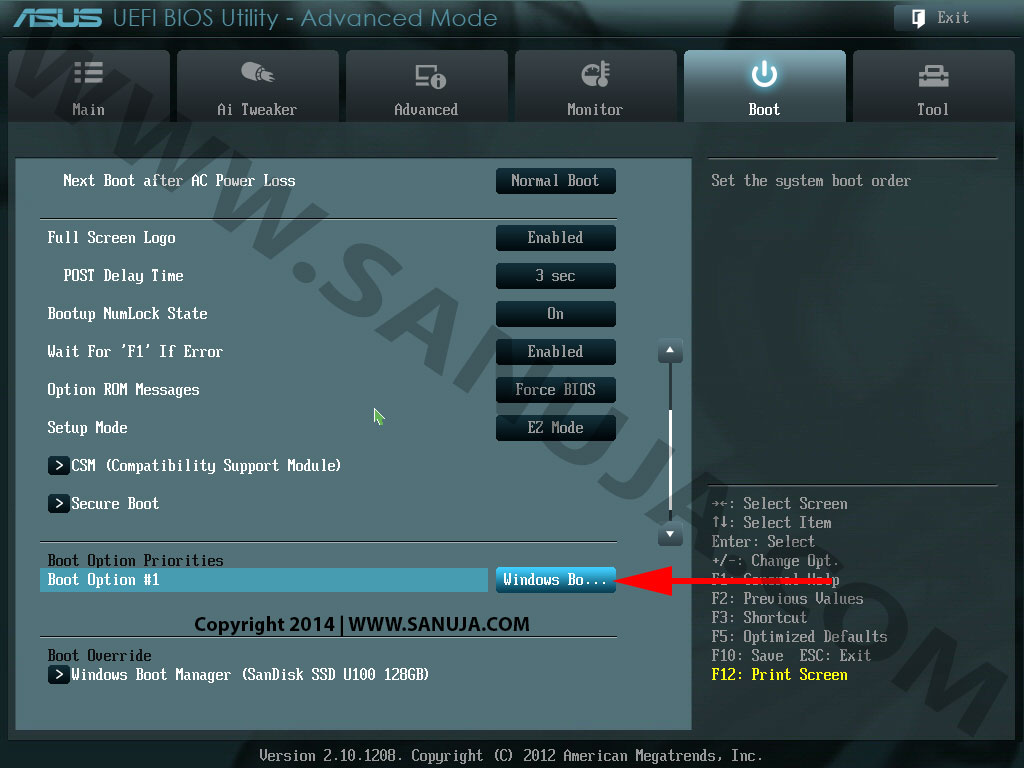
5) Select “Boot” tab from the top and make sure the “Boot Option #1” under “Boot Options Properties” reads “Windows Boot…”.
6) Now press “Exit” at the top and select “Save Changes & Reset”. Your system should boot up normally.
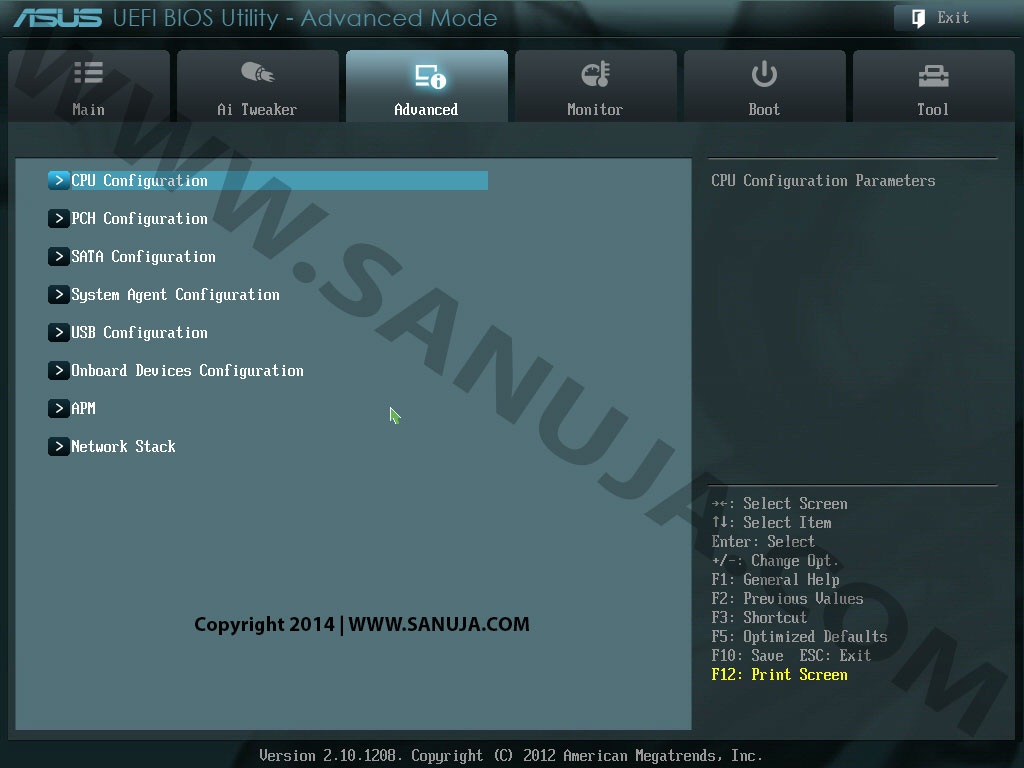
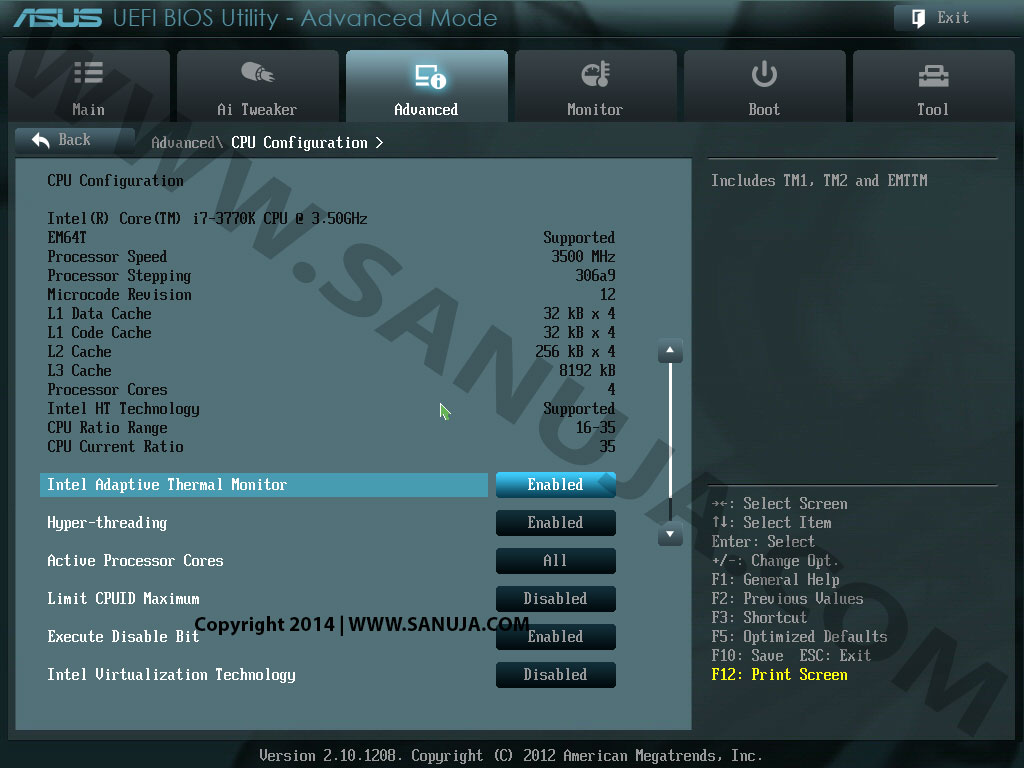
If this also failed to resolve the problem, you are not in danger of losing your computer. Go back to “Advanced Mode” and select “Advanced” tab from the top. Now change the Intel CPU variables until you find a solution. This is under CPU Configuration section. Try different combinations. I recommend disabling “Limit CPUID Maximum” and “Intel Visualization Technology”. That is what worked for my computer.
Fixing the could not get into UEFI/BIOS error
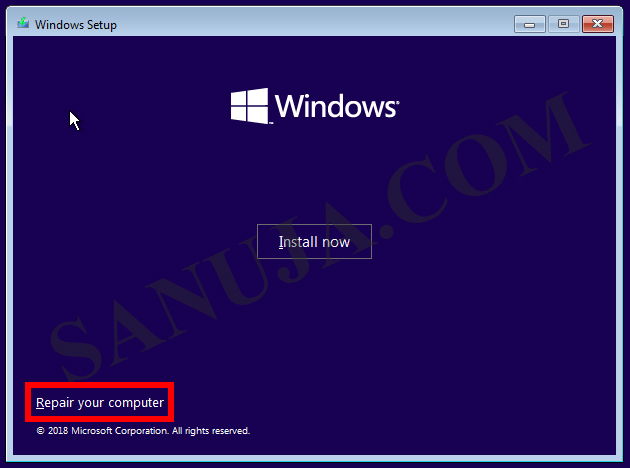
In some situations, you may not be able to get into UEFI or BIOS screen at boot up. You can bypass this issue using Repair your computer option with a Windows bootable ISO.
1. Insert the Windows installation media to a bootable drive. Follow the instructions appear on screen for boot from the media. Typically it is any key and message would be “Press any key to boot from CD (or USB)…“
2. Once Windows setup has initialized, on the Windows Setup screen, select Repair your computer option.
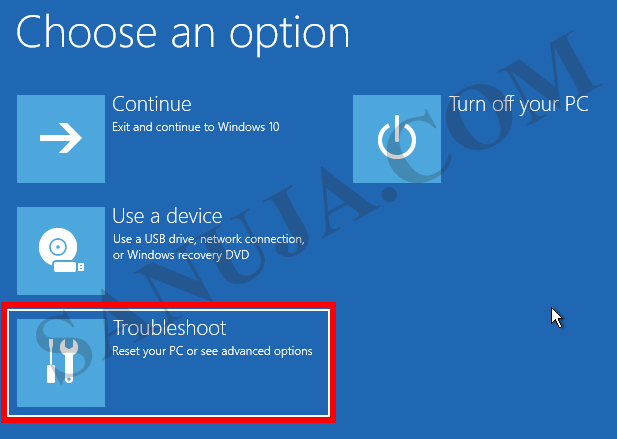
3. In Recovery menu, select Troubleshoot option.
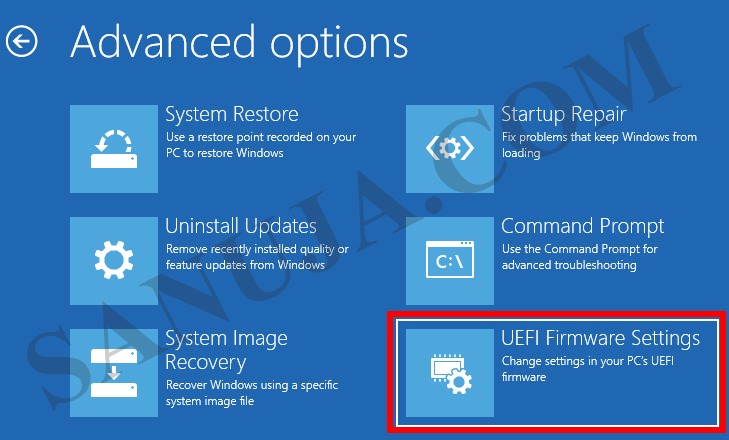
3. In Troubleshoot menu, select UEFI Firmware Settings option and on the next screen, select Restart. When the system restart, it will load the UEFI screen. At this point set the UEFI to default settings (follow the instructions listed above or consult your BIOS/UEFI manual for resetting).

CMOS Battery pull
Finally, if the resetting or tweaking of BIOS/UEFI as described above did not resolve the issue, you may pull the CMOS battery out of your motherboard. This should reset some of the information on the BIOS/UEFI. However, some modern motherboards and server motherboards may have non-volatile chip-sets that keeps the config information even after pulling the CMOS battery out of the system.
Please note that the above instructions are not Scientific nor approved by the manufactures. They are based on my personal experience. I have fixed few Asus computers with this issue by following the steps. There is no way I can guarantee that these steps will also work for your system. Use the information with caution.