Some of you may have heard about the term “root” or “rooting” with regards to the Android mobile Operating System. This term is not something new to computer and software geeks. The root is the most fundamental level in a UNIX or Linux based operating system. In order to install some apps and to tweak the behavior of an OS, you need the root access.
Due to various variables, every option listed here may not work for your particular phone.
Warning!
Please read the entire article first before modifying your device. This process describes here will void your warranty. If instructions are not improperly followed, it could cause the phone to brick (f-up beyond repair). Knowledge in Linux and Android programming is an asset. I take no responsibility for any issues arise from this article. Do it at your own risk!Introduction to Android
I am not going to give a long history on Android. From a technical perspective, you should know that it is an open-sourced mobile Operating System currently supported and developed by Google. More than a hand full of manufactures use this OS to streamline their devices. Android can be installed on mobile phones, tablets, televisions, GPS units, and any other electronic devices that support such architecture.
Rooting
Rooting is granting access to most fundamental operations that otherwise will be blocked by system default. While not all applications of rooting may harm the device, due to the wide openness of what you can do with root access could brick your device (f*&^ked up beyond repair). This is why rooting an Android device will void your manufacture’s warranty. If you are not technically inclined, I would stay away from rooting. This article is written for tech guys who have limited experience in Android environment.
This also places a lot of responsibilities on the end-user. After rooting a device, you will not have the “safety net” from malicious apps that otherwise will be in placed by default. It will be your sole responsibility to manage your root access permissions wisely.
How to Root an Android
Installing the Recovery
1) Download and install the drivers for your device from the manufactures. You may find them on their support website and/or the media that was provided to you by in the original packaging.
2) Download ODIN software. It will make it easier in flashing recovery and the rooted firmware. Please note that the ODIN will only work on Windows-based computers.
3) Download the Odin flashable recovery (.TAR file) for your device then copy it to the same folder as Odin. There is another option if you have a .img file. Please read further down for instructions.
4) Open ODIN by right click on Odin.exe –> “Run as administrator”. You should come up with a window similar to the following.

5) Turn off your phone and reboot into Download Mode. In order to go into the Download Mode, hold Volume Down + Home + Power while it shuts down. Continue to hold until the device is powered up and a text message appears on the top corner (very small sized texts). Once inside the Download Mode, press Volume Up to enter.
6) Connect the device to computer via USB/charger cable. It is recommended to use the original manufacture provided cable. If your phone do not support USB 3.0, please do not use USB 3.0 port on your system even if it is backward compatible. This is just to be safe.
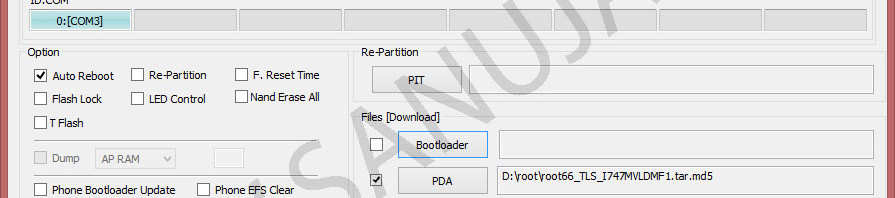
7) The ODIN window should have a COM** port highlighted as shown here.

If ODIN is not highlighting the port, go back and make sure you have properly installed the right device drivers from your hardware manufactures.
8) Click on the PDA button on the right pane of the ODIN. Refer to above image.
9) When prompted (once the PDA button is selected) go to the firmware location and select the firmware file (TAR file).
10) Warning! Make sure Auto-Reboot and F. Reset Time are the only options checked and that PDA is the only other thing checked on ODIN before starting the flash. CHECK again and again your settings and that you have selected the correct firmware for your model phone and are using the correct options. If you are using a laptop, make absolutely sure you are plugged in, or if on battery, that it is charged enough and will not go into sleep mode during flash.
11) Click Start to begin the flash. This will take a while, so be patient. Do not unplug or remove the battery during the installation. I highly recommend placing the device on a solid stable surface with the USB cable attached during this process. I would not move the device since some computers and devices have lose USB connections which could potentially disconnect your device. If the device gets disconnected, this may result in bricking your phone.

12) Once the installation is successfully completed, the ODIN will report PASS on the top left hand corner. The phone should have automatically rebooted at this time.

13) Wait at least 5-10 minutes (or even as long as 30 min) for the system to boot the first time and then build its cache. Do not remove the battery or disconnect power during this time.
You may now flash a ROM file using the PDA button on the ODIN. You can also flash a ROM using either a custom recovery or the default system.
Another option for ROM Flash
1) Download the appropriate ROM zip file and save it on your phone (just like saving any other file).
2) To get into the recovery mode, hold Volume Up + Home + Power while it shuts down. Continue to hold until the device is powered up. An example of a recovery screen is shown below (CWM).

3) Choose “install zip” (or “install from zip”, “install ROM”, etc) and select the zip file you saved.
4) After few minutes you should get a success message. Now go back and reboot your phone.
Third option for ROM Flash
You may flash a ROM that comes in the image (.img) format. Do not feel overwhelmed by the coding. Just follow the instructions and it will be installed on your device in few seconds.
1) Download a recovery image of your choice. For example; ClockworkMod Recovery Images. Save the .img file in your device’s memory.
2) Rename the image file to recovery.img or anything of your choice. Note: If you decided to rename the file other than recovery.img, then please change the second line of code appropriately to reflect the file name (dd if=/sdcard/YOUR_FILE_NAME.img of=/dev/block/mmcblk0p18).
3) Download a terminal app, which will allow you to enter commands into your Android system.
4) Open the terminal app and follow these instructions.
– type and enter
$ su
– type and enter
# dd if=/sdcard/recovery.img of=/dev/block/mmcblk0p18
– type and enter
# reboot recovery

There are significant risks associated with this method. If you flash an incompatible ROM or if you enter the codes wrong, you could end up bricking your phone.
Common Errors
During the rooting and installation process of a custom ROM, you may come across errors. Do not panic because most of these errors are common and can be fixed.
Status 7 Error – installation aborted
Be warned that editing the code impropriety may result in bricking your device. Before edit the code in the ROM zip folder, make sure that you have the right ROM for your phone. By removing the code, we essentially removes the safety mechanism in which recoveries like ClockworkMod uses to block invalid zips from being installed.
Clear codes in updater-script file up to (NOT including) show_progress(0.500000, 0);. You should be able to locate this file at, META-INF –> com –> google –> android. The number of lines that should be deleted varies with each custom ROM. For example, the CynogenMod 10.2 will have the following check code at the very binging.
assert(getprop("ro.product.device") == "d2att" || getprop("ro.build.product") == "d2att");
assert(getprop("ro.bootloader") == "I747UCDLK3" ||
       getprop("ro.bootloader") == "I747MVLDLK4" ||
       getprop("ro.bootloader") == "I747MUMBLK3" ||
       getprop("ro.bootloader") == "I747MUMBLL1");
mount("ext4", "EMMC", "/dev/block/mmcblk0p14", "/system");
package_extract_file("system/bin/backuptool.sh", "/tmp/backuptool.sh");
package_extract_file("system/bin/backuptool.functions", "/tmp/backuptool.functions");
set_perm(0, 0, 0777, "/tmp/backuptool.sh");
set_perm(0, 0, 0644, "/tmp/backuptool.functions");
run_program("/tmp/backuptool.sh", "backup");
unmount("/system");
Initial boot stuck in a loop
Go back to recovery and clear (wipe) user data, System, Cache and Dalvik. Instructions for will soon be posted here. These options are in the recovery section under “advanced” menu.
GooglePlay Store is not installed
Most custom ROMs do not include GooglePlay files. You need them not only to download apps, but also for basic functions such as the Google Keyboard. You can flash this file into your device using the any compatible ZIP file available online with the GooglePlay Store.
1) After downloading the ZIP to your computer/phone, relocate the ZIP file to the root of your device storage main memory. This will make it easier to find during flashing.
2) Go to the Recovery Mode and select “install zip”. 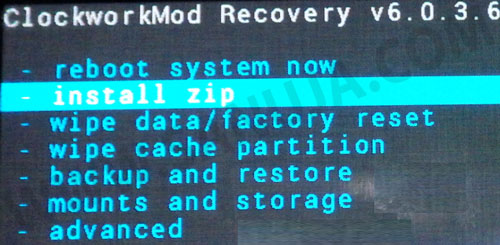
3) Select the option for device storage memory. 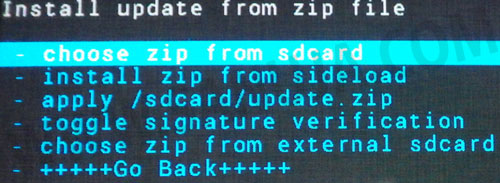
4)Go back and clear memory before rebooting. Once the reboot is complete, you should see your GooglePlay app. If you end up with a connection error even when you have a wifi or mobile network connection, try the following for troubleshoot:
– Check if you have installed the latest compatible version of gapps for your mod.
– Check if the hosts configuration is correct using a file explorer app. Go to device root -> etc -> hosts (open as a text file).
– If both of the above failed, delete the GooglePlay app (from the settings), then re-download the ZIP and start this process over. Sometimes during download process, the file gets corrupted.
Too many choices; help me out
To a novice Androider, choosing what recovery and ROM to flash along could discourage rooting. I am all for choices, but sometimes even I need some guidance. You may choose any recovery and ROM that is compatible with your device. You may even use the stock ROM with the root access. It all depends on your choices. However, in case you need my opinion (personal choice), this is what I would recommended:
- Compatible version of ClockworkMod Recovery (Touch or non-Touch)
- Compatible version of CyanogenMod stable release
- SuperuserSU app for controls
- Compatible signed version of Google Apps zip
Happy rooting 🙂